
eFORMz TXT To XML Guide: Getting Started
Part Two: eFORMz TXT to XML Guide: Reset Line Number Count
Part Three: eFORMz TXT To XML Guide: States
Part Four: eFORMz TXT To XML Guide: State Loops
What does TXT to XML mean? It simply means taking a text file and turning it into an XML file.
In eFORMz the first thing you want to do is load in your text file that you want to have changed to XML. eFORMz also has a feature in “Output” that output as a text file. For example, if you had a CVS file and you wanted to convert it to text. You could run the “Output” setting in eFORMz and set it to be Text.
You can load in the Text file many different ways into your project, but in mine, it was imported it through a “Preprocessor” that takes an output from a different eFORMz project that is creating my text file.
Right click on your Project, mine is named “TextToXMLBackup”, “Add Preprocessor”, “Project”.
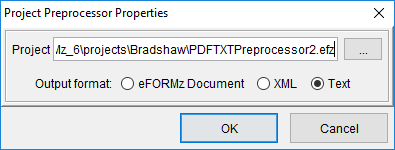
It will open up to the “Project Preprocessor Properties” page. In here is where you would insert the file path of where your project that Is creating the text file. Ex My file input’s name is the following: “Minisoft\eFORMz_6\projects\Bradshaw\PDFTXTPreprocessor2.efz” Select that the output format from this project is “Text”.
If this was successful you should see a folder that is named “Preprocessors” with a bullet that says “Project.
![]()
Next add another preprocessor called “Text to XML Converter” and you should see the following properties screen.

The following options are explained here:
Configuration File: The file to configure the initial settings of the Text to XML Editor. This is an optional parameter and can be left blank. (This is where you could load in your text file if you did not want to have a preprocessor load it in and edit it)
Stock Configuration File: A pre-existing file that configures the initial settings of the Text to XML Editor. NOTE There are three stock options: RedPrairie Ship Confirmation, RedPrairie Order Confirmation and blank.
The RedPrairie Ship Confirmation structures the initial settings of the Text to XML Editor to handle a shipping confirmation generated by the RedPrairie Direct Commerce system. The RedPrairie Order Confirmation structures the initial settings of the Text to XML Editor to handle an order confirmation generated by the RedPrairie Direct Commerce system. These files can be modified with the Text to XML Editor, but by specifying the basic conditions, they can save the user significant time. Note: Default is blank.
Record delimiter: Separates groups of fields by specifying the boundaries of the data stream. Default is a linefeed (\n = new line).
Character Set: All numbers, letters and symbols associated with a given coding system.
Show Editor while in composer: When checked, displays the Text to XML Editor in the eFORMz Composer (Window > Text to XML Editor) Default is unchecked.
Once you have accepted it you will see the bullet “Text to XML Converter” under the Preprocessors folder.

Right click on the bullet “Text to XML Converter” and select “Text XML Editor”. It will pop-up with this screen.

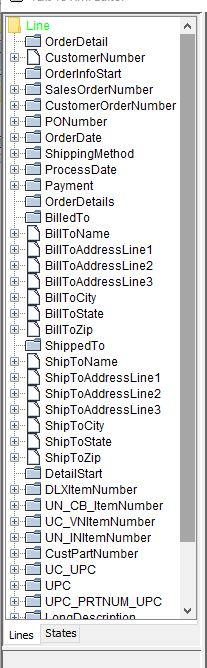
The left column contains “Lines” and “States”. The picture shows the viewer in “Lines” Mode. Line mode is used to determine where text is on a certain line. The ordering of the lines go from top to bottom. Please ignore my variables I already have in my “Lines” column.
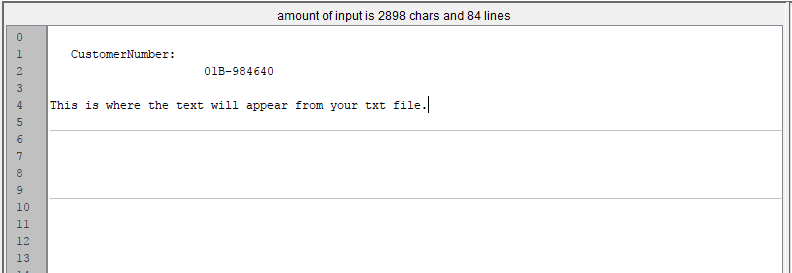
This is your text that you imported into your project that we will turn into XML.
Lets start by capturing the first line of text in XML. Right click on the “yellow folder” at the top of the “Lines column” and select “Insert Line”. When the line Is created it will default to “Line_(a number)”. Click on that line and edit the properties value that is in a window below the column. It will look like the following photo below.
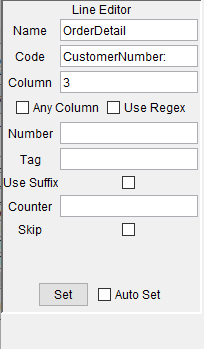
I called my first line “OrderDetail” and gave it a code of “CustomerNumber:” at column 3. What this means is that in the text portion it will look for the literally text “CustomerNumber:” at column 3.
You can see the row, and columns placement by moving your cursor to a desire location in the text and then checking where it is at the bottom of the page, which is shown in the picture below.

Notice there is a “Set” button and a “Auto Set” radio button. Make sure to check the “Auto Set” as it will always save and update your changes without having to manually click “Set” eachtime. Once you have clicked “Set” or set-up “Auto Set”. Press the “Test” buttom in the bottom right hand corner of the page. You MUST press test each time to see your changes update. Don’t forget to always select Test to see new updates.
![]()
If everything succeeds when you click on your variable it should highlight the line in the text. I have selected “OrderDetails” and it highlights the line it is on. That is because I have my settings set to column 3, search for the text “CustomerNumber:”. Currently the CustomerNumber is a line below the where it should be due to PDF to TXT encoding. How can we receive that number? There is no text that we can use to search for that will allow us to know here to get that information.

You can get this information by creating a state. What is a state? A state is used to create folders in XLM, and the final variables in XML that you want. It also can organize the way you process the data from your text.
Select the “States” tab at the bottom of the column next to the “Lines” tab. You should have a screen similar to the photo below. Please ignore all the states my project currently has. Yours will not look like mine.
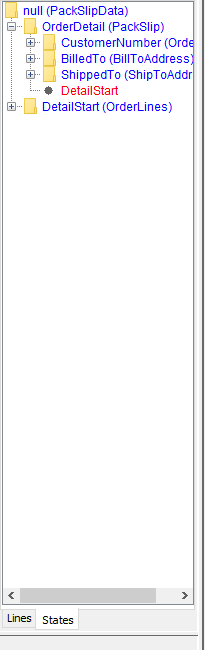
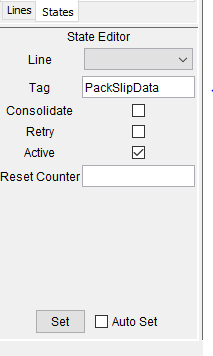
The first folder you see at the top is the XML folder that everything is going to be inside of. It defaults to be called null. Click on the “null” folder at the top and rename it to whatever you want that folder name to be. I named mine “PackSlipData”. The “Tag” row is how you define what your want your folder name/variable name to be. Click on the “Active” tab in the “State Editor” as shown below. Once you have finished select “Set”.
Right click on the state your renamed and select “Add State”.
![]()
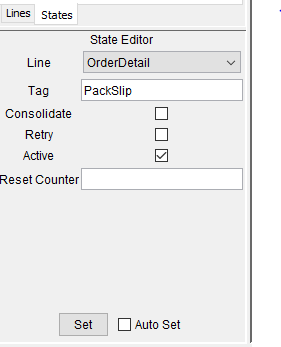
It will default to this when you first add a state. Click on the your new “null (null)” state and go into the “State Editor”. Then select a line. Selecting a “Line” will come from the “Lines” columns that you have created before. For example my variable “OrderDetail”. Select “Set”. If you want this variable to be inside of a folder inside of the folder “PackSlipData” then you would put in a name into the tag row of “OrderDetail” state like the photo below. I will name my folder “PackSlip”. If you wanted the variable inside of the folder “PackSlipData” you simply would leave the tag row blank. This can be done multiple times to created nested folders.
If successful it should look like this, without the plus sign because I have other states inside of that state that we will get to.
![]()