
UPC-EAN Check Digit
If the data for a UPC-A, UPC-E, EAN8 or an EAN13 barcode doesn’t have a check digit, it can be calculated within eFORMz. An example using a UPC-A barcode is shown below. To follow along, download the relevant files here: UPC-A CheckDigit Sample.
To watch the video, view it on Vimeo or YouTube.
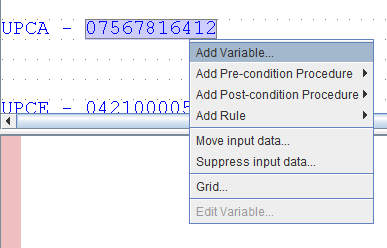
1. Right click the UPC-A data string and select Add Variable.
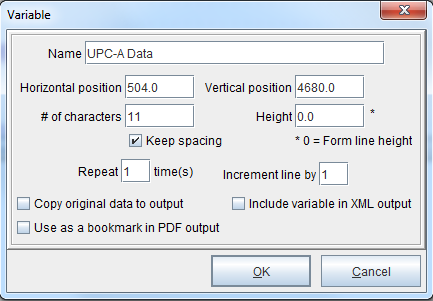
2. The Variable dialog box will display. Enter a name (UPC-A Data in this example) and click OK.
3. Right click the UPC-A data string again and select Add Variable.
4. The Variable dialog box will display. Enter a name for the check digit (UPC-A CheckDigit in this example) and click OK.

5. Right click the check digit variable (UPC-A CheckDigit in this example) and select Add Function > UPC-EAN check digit.
6. Next, right click the form and select Add Variable > By position.
7. The Variable dialog box will display. Enter a name for the first text character of the UPC-A string. Click OK.

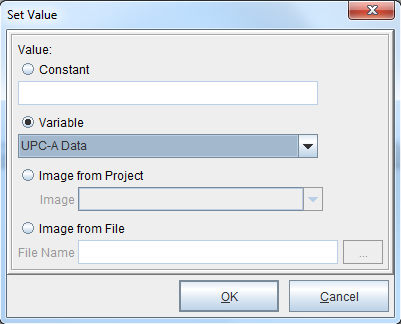
8. Right click the variable and select Add Function > Set value.
9. Select the variable created for the UPC-A data from the Variable drop-down menu.
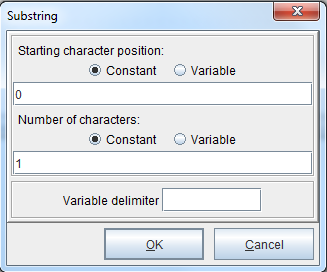
10. Right click the variable and select Add Function > Substring.
11. The starting character position should be 0, and it should span 1 character. This will set the variable value to include only the first character of the UPC-A data string.
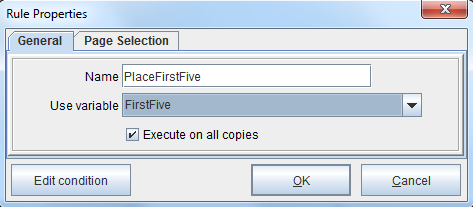
12. Create another variable by position by right clicking the form and selecting Add Variable > By position. This variable should be named for the next 5 text characters of the UPC-A string (FirstFive in this example).
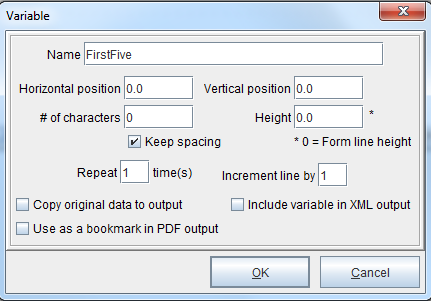
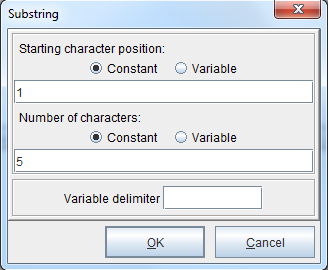
13. Like before, right click the variable and select Add Function > Set value. Select the variable created for the UPC-A data from the Variable drop-down menu. Right click the variable and select Add Function > Substring. The starting character position should be 1, and it should span 5 characters. This will set the variable value to include the second character through the sixth character of the UPC-A data string.
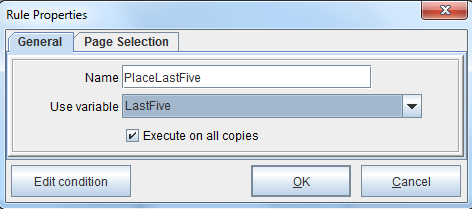
14. Add a variable by position. Name the variable for the last 5 text characters of the UPC-A data string (LastFive in this example).
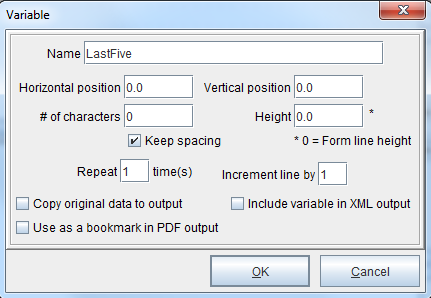
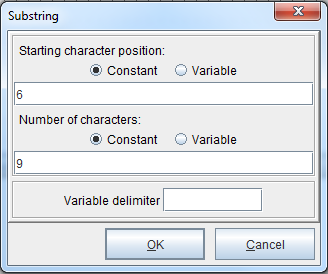
15. Again, right click the variable and select Add Function > Set value. Select the variable created for the UPC-A data from the variable drop-down menu. Right click the variable and select Add Function > Substring. The starting character position should be 6, and it should span 5 characters. This will set the Variable value to include the seventh character through the twelfth character of the UPC-A data string.
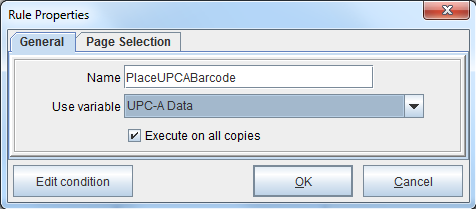
16. Right click in the Form Viewer and select Add Rule > 1D Barcode.
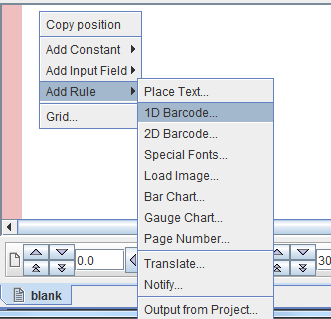
17. Select the variable created for the UPC-A data from the Use variable drop-down menu.
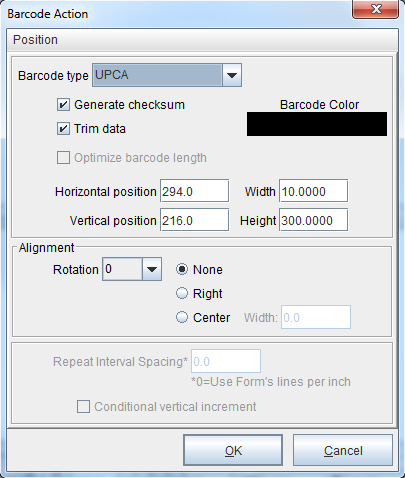
18. Select the ‘UPCA’ option from the Barcode type drop-down menu. Make sure that the Generate checksum box is checked. This generates the check digit for the barcode automatically. Click OK.
19. The barcode will display.
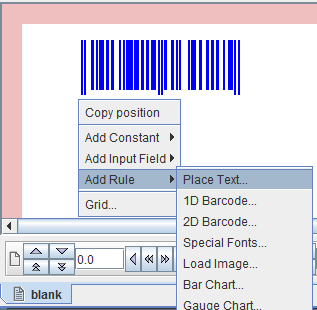
Right click below the barcode and select Add Rule > Place Text to begin placing the text characters.
20. Select the Variable created earlier that contains the first character value from the Use variable drop-down menu.

21. The Place Text Action dialog box will display. Select the Change font button in the bottom left. Set the appropriate font and characters per inch. Click OK.

22. To add the next 5 characters, right click below the barcode and select Add Rule > Place Text. Select the variable created earlier for the second through sixth characters of the UPC-A data string from the Use variable drop-down menu.
23. The Place Text Action dialog box will display. Make any necessary modifications to the font by selecting the Change font button in the bottom left. Click OK when complete.
24. To add the final 5 characters, right click below the barcode and select Add Rule > Place Text. Select the variable created earlier for the seventh through twelfth characters of the UPC-A data string from the Use variable drop-down menu.
25. The Place Text Action dialog box will display. Make any necessary modifications to the font by selecting the Change font button in the bottom left. Click OK when complete.
26. Finally, to add the check digit, right click below the barcode and select Add Rule > Place Text. Select the variable created earlier for the check digit from the Use variable drop-down menu.
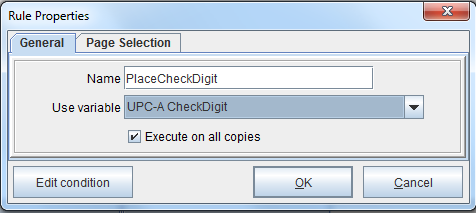
27. The Place Text Action dialog box will display. Make any necessary modifications to the font by selecting the Change font button in the bottom left. Click OK when complete.
28. The text characters of the UPC-A data string will display below the UPC-A barcode.
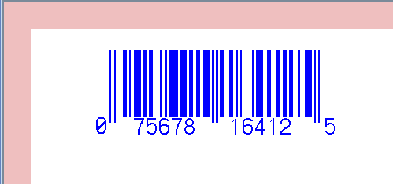
NOTE: In this instance, the data string for the UPC-A barcode is 07567816412, without a check digit present. The UPC-EAN check digit function calculated the check digit to be 5. To confirm this manually, first add the odd number digits: 0+5+7+1+4+2 = 19. Next, multiply the result by 3: 19 × 3 = 57. From there, add the even number digits: 7+6+8+6+1 = 28. Add the two results together: 57 + 28 = 85. To finish calculating the check digit, take the remainder of the result divided by 10 (85 / 10), and subtract from 10 (8.5 – 10). The result is -1.5. The quotient is 1 and the remainder is 5, so the check digit is 5.