
Schema Editor
The Schema Editor
This page is kept for reference purposes.
The current documentation is kept in the online manual.
The Schema Editor is used to create and edit schemas. Schemas are HP 3000 files that contain descriptions of TurboImage databases, KSAM files, and MPE files. Schemas can be included in a datasource on the Schema tab of the datasource configuration dialog of the ODBC driver.
KSAM and MPE files must be described with the Schema Editor to be accessible through ODBC. TurboImage database may be redefined with the Schema Editor to change the way they are presented through ODBC.
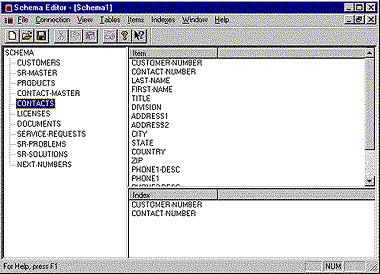
The Schema Editor is executed by clicking Schema Editor in the Minisoft program group. Its main screen is shown in Figure K-1
Connection to your HP 3000
Since the Schema Editor stores schemas as files on the HP 3000, connection configuration information is needed to make connections to the HP 3000. The Connection – Edit menu selection is used to display the Connection Configuration dialog box (Figure K-2)
• Your HP 3000’s IP address or host name should be entered in the Server Name field.
• The Server Port field default value is 30006 and is typically never changed.
• Enter valid login information in the other fields.
• The Load button can be used to load a saved configuration from a file.
Once the dialog is completed and OK is pressed, use the Connection – Save menu selection to save the connection configuration for later use.
You can automatically load a connection configuration when the Schema Editor starts by including the file name of the connection configuration on the command line for the Schema Editor icon.
Creating a Schema for KSAM and MPE files
To create a new schema, select the File – New menu selection. A connection configuration dialog will appear. Complete the dialog as explained above and press OK. The New Schema dialog box appears (Figure K-3)
There are two choices when creating a new schema: create a blank schema, or create a schema from a TurboImage database. Create a blank schema when you wish to describe KSAM and/or MPE files.
The Schema Name field will be the name of the file on the HP 3000 that the schema is stored in. Do not include the group and account in this name.
Once the OK button is pressed the schema is shown in the main window (Figure K-4).
The Tables – Add menu selection is used to add table definitions to the schema.
The View – Table Properties menu selection is used to view and edit the table properties. The table properties are contained on two tabs in the Table Properties dialog box:
• The Definition tab shows name, alias, and type of the table. For KSAM and MPE files all of these fields can be modified. The alias name, if entered, is the name that will be presented through the ODBC driver (Figure K-5).
• The File Open Info tab contains the open information for the file. All these fields may be changed (Figure K-6).
The Table Properties dialog box is modeless, so it will remain display until it is explicitly closed using the close button.
Adding and Editing Items
NOTE:
Item Names for Record Based or Calculated items are Image syntax. Names with hypens must be entered with hypens. They will appear as underscores in your client application.
The Expresion part of Calculated items are in SQL syntax. Names of existing items must be entered in converted form where hypens become undercores.
Record Based
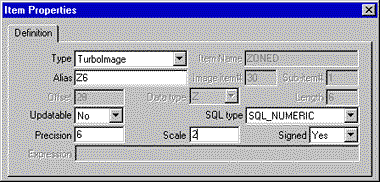
To add items to a table, select the table by clicking on it, and then select the Item – Add menu selection. The View – Item Properties menu selection is used to view and edit the item properties (Figure K-7).
• For KSAM and MPE files, the Type is always Record Based.
• The Item Name and Alias Fields name the item.
• The Offset, Data Type, and Length fields describe where the item is located in the record and what type and size it is. The type and lengths must be valid TurboImage type and length specification, except that the size may specify a storage that is not an even number of bytes.
Note: The byte size of the item depends on the Data Type and Length according to the rules for TurboImage data items. For example: a P10 would be shown with a type of P and a length of 10. The offset of the next field would be five bytes from the offset of the P10.
• The SQL Type field specifies the data type that is presented through the ODBC driver. See the section Data Conversion, below, for more information on using this field.
• The Precision field specifies the total number of digits contained in a fixed numeric data item. Fixed numeric data items have SQL types of SQL_SMALLINT, SQL_INTEGER, SQL_BIGINT, SQL_NUMERIC, and SQL_PACKED.
• The Scale field specifies how to scale numeric data items of SQL_NUMERIC and SQL_PACKED types. The number represents how many places the decimal point is moved to the left.
The Item Properties dialog box is modeless, so it will remain displayed until it is explicitly closed using the close button.
Adding Calculated Items
Create a calculated item by selecting Add Calculated Item from the Items menu. Highlight the new item you created and select the Properties option from the View menu. (Figure K-20)
To create a calculated item define it with an expression. The expression is any valid ODBC expression. For example, to create a NEW calculated item called TOTAL_DUE that would be the difference of items TOTAL_OWED and TOTAL_PAID, the expression would be “TOTAL_OWED – TOTAL_PAID”.
Example:
Using the Image items (TOTAL-OWED and TOTAL-PAID) you could make the calculated items:
TOTAL_OWED – {fn ABS(TOTAL_PAID)}
TOTAL_PAID – {fn MOD(TOTAL_PAID,100)}
You can also enter valid ODBC functions. An example of using the concat function would be:
{fn CONCAT(CUSTOMER_NUMBER, CUSTOMER_NAME)}
Use the ODBC escaped syntax for Expression entries. For a list of supported functions see ODBC/SQL Functions.
Adding and Editing Keys ( Indexes )
To add indexes to a table, select the table by clicking on it and then select the Indexes – Add menu selection.
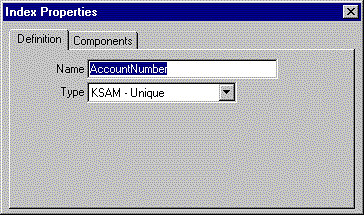
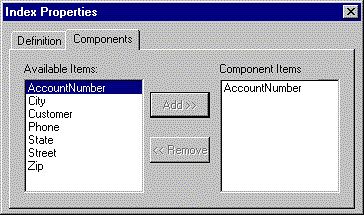
The View – Index Properties menu selection is used to view and edit the index properties. The index properties are contained on two tabs on the Index Properties dialog box:
The Definition tab names the index and specifies a type.
The Components tab specifies which data item is indexed by this index. Select a data item from the Available Items listbox and use the Add button to add it to the Component Items listbox.
Creating a Schema for a TurboImage Database
To create a new schema, select the File – New menu selection. A connection configuration dialog box appears. Complete the dialog as explained above and press OK. The New Schema dialog box appears.
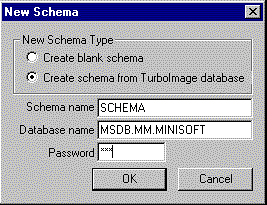
Select Create Schema From TurboImage Database and enter the database name and password. A new schema will be initialized with a description of that database.
Saving the Schema
Select File – Save or File – Save As to save a schema.
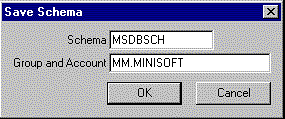
The Schema and Group and Account fields name the file to store the schema in.
Note that you must be logged into the account specified and have write and save access to the group and account in order to save the schema file.
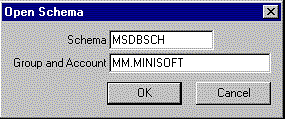
Opening a Schema
Select File – Open to open an existing schema file.
Data Conversion
The SQL type field in the Item Property dialog box can be used to change the way client applications ‘see’ a data item.
A common situation is that a database or file has items of type J, I, or Z that represent money amounts in cents. Typically client applications will see an item of this type as an Integer or Long Integer, but the user would like to use it as number with two decimal places. Types of Integer and Long Integer cannot support decimal places so the data type must be changed. By specifying an SQL type of SQL_NUMERIC or SQL_DECIMAL and a Scale of 2, the client application will see the item as a dollar amount.
MPE Data Types
Use the Image data Type and Length when defining the type used in Image, KSAM, or MPE fields. This reference chart can be used to determine the appropriate type from your existing source code. The bytes reference will guide you in determining the width of each item so that the offset for the next item can be found.
| Type | Length | Bytes | Image | Cobol | C/XL | Pascal/XL |
| I | 1 | 2 | I | PIC S9 to S9(4) | short int | shortint |
| I | 2 | 4 | I2 | PIC S9(5) to S9(9) | int | integer |
| I | 4 | 8 | I4 | PIC S9(10) to S9(18) | longint | |
| J | 1 | 2 | J | PIC S9 to S9(4) | short int | shortint |
| J | 2 | 4 | J2 | PIC S9(5) to S9(9) | int | integer |
| J | 4 | 8 | J4 | PIC S9(10) to S9(18) | longint | |
| K | 1 | 2 | K1 | unsigned short | ||
| R | 2 | 4 | R2 | float | real | |
| R | 4 | 8 | R4 | double | longreal | |
| E | 2 | 4 | E2 | float | real | |
| E | 4 | 8 | E4 | double | longreal | |
| U | n | n | U | PIC A(n) | char[n] | packed array [1..n] of char |
| X | n | n | X | PIC X(n) | char[n] | packed array [1..n] of char |
| Z | n | n | Z | PIC 9(n) | packed array [1..n] of char | |
| P | 4 | 2 | P4 | PIC S9(3) USAGE COMP-3 | packed array [1..2] of char | |
| P | 8 | 4 | P8 | PIC S9(7) USAGE COMP-3 | packed array [1..4] of char | |
| P | (n+1) | (n+1)/2 | P(n+1) | PIC S9(n) USAGE COMP-3 | ||
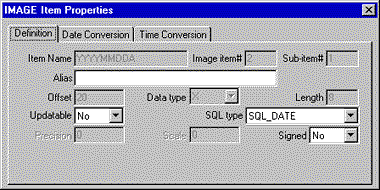
Using Date
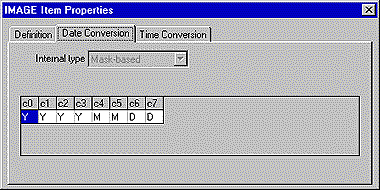
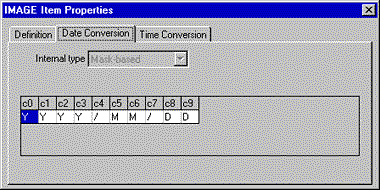
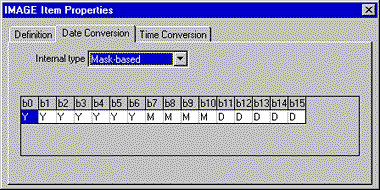
To use dates, change SQL type of the Item to SQL_DATE.
Character types will be Mask-based either with or without a seperator.
Numeric types can be mask or value based.
If the ‘M’ character is not used in the date field, the ‘D’ character is used as a Julian date.
Samples are shown below:
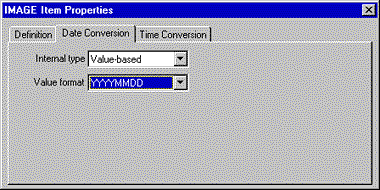
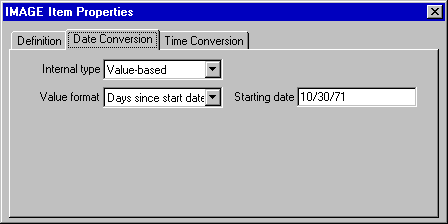
ManMan Dates
ManMan dates can be used by selecting the approriate field and seeting the Internal type to “Value-based” and the Value-format to “Days since start date” and the Starting date to “10/30/71”.
Why Use the Schema Editor
The Schema Editor is used to create and edit Schema Editor Files. Schema Editor Files are stored on the HP 3000 and contain descriptions of TurboImage databases, KSAM files, and MPE files. Schema Editor Files can be included in a datasource on the Schema tab of the datasource configuration dialog of the ODBC driver.
KSAM and MPE
KSAM and MPE files must be described with the Schema Editor to be accessible through ODBC.
Image
TurboImage database may be redefined with the Schema Editor to change the way they are presented through ODBC.
Commonly, you may need to redfine a character or numeric type as SQL_DATE.
TurboImage item names with any special character other than the hyphen (-) must be given an alias name to be accessed.
Adding a new item requires a Schema Editor.
Some items are composed of a number of sub-elements. By adding an item, you can access any portion of the Image Buffer as any data type