
Host Project Transfer
When you are ready to transfer a project to your host, go through the following instructions for your host system:
iSeries/AS400
To save a project file to your iSeries/AS400 host system:
1. Open the project file from within the eFORMz Composer. From the main task bar select File > Open Project. The Open dialog box will appear. Select the project file you would like to upload to your host system.
2. From the Host Tools menu select AS400 > Save Project. The Save dialog box will display. If you are not already logged in, an AS400 login dialog box will appear. Select the directory you would like to save your project to (default directory: minisoft) and then click Save.
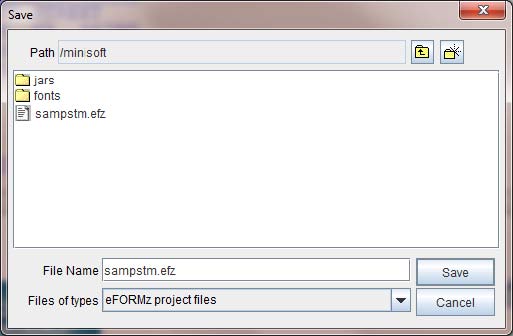
Your eFORMz project file will be uploaded to the AS400 directory. If the file already exists a dialog box will appear asking you if you would like to overwrite the existing file. Click Yes for overwrite or No to cancel the process.

To open an existing project located on the AS400 host system:
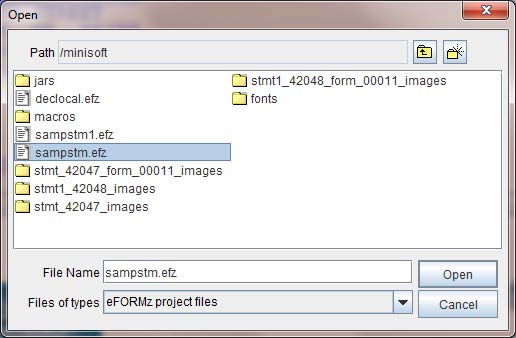
1. From the eFORMz Composer main menu select Host Tools > AS400 > Open Project.
2. The Open dialog box will display. Select the project file you would like to open from one of the AS400 directories. The Open dialog box defaults to the Minisoft directory.Once your project file has been selected click Open.
3. An open Data File dialog box will display. If you have an existing data file on your PC select the data file from its directory, otherwise, click Cancel.
4. Your project file will display in the eFORMz Composer.
Unix
To save a project file to your Unix host system:
1. From the eFORMz Composer open the project you would like to upload to the Unix host machine (File > Open Project).
2. Once the project file has been opened, select Host Tools > Unix > Save Project.
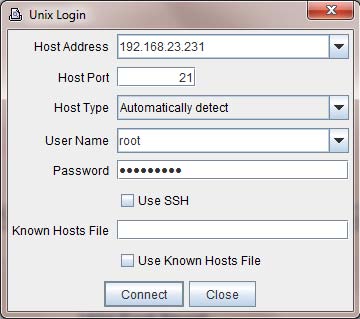
3. The Unix Login dialog box displays. Enter your Host IP Address, user name, and password and then click Connect.
4. The Save dialog box will display. Enter the name you would like the project to have on the Unix system in the File Name field. By default the project path is the minisoft directory under root. Click Save.
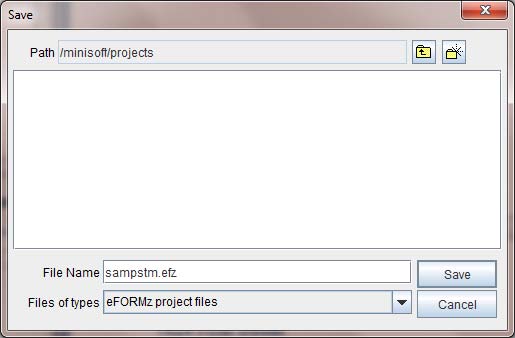
5. Once the save has completed you will returned to the eFORMz Composer.
NOTE: After the transfer of the project file to the host system, a change to the attributes of the project file must take place. From your host machine:
1. Logon as Administrator (root).
2. Change the directory to minisoft.
3. From the minisoft directory change the attributes of the project file: chmod 755 {project name}.efz
Note, you will also need to do the above attribute change once you have created the command file.
TIP: A project file can also be opened from the Unix system:
1. From the eFORMz Composer select Host Tools > Unix > Open Project. Login using your username and password and click Connect.
2. Select the directory where your project file is located and select the project file you would like to open.
3. Click Open. Your project file appears in the eFORMz Composer. Make the necessary changes and then select Host Tools > Unix > Save Project to save your project file back to the Unix system.
If you are planning on implementing the merge process via a command process use the following instructions to create a project script file. To create the script (.cmd) file:
1. From the eFORMz Composer main menu select Host Tools > Unix > Save Project Script.
2. The Script Builder dialog box will display:

Input Directory
Using the browse button select the directory your data files will reside in to be merged with an eFORMz project file.
File Selection
Using the browse button select the data file name. Use asterisks (*) for multi data file selections (i.e. sampstm*.dat or *stm.dat).
Disposition
If you would like the print file to remain in the input directory after a merge has taken place, select Change extension of selection file to “.hld”. If you would like the print file to maintain its original extension select Append “.hld” to the selected file. This will cause the .hld to append to the end of the original extension. If you would like to delete the print file from the input directory after a merge has taken place, select Delete selected file.
Project
Using the browse button select the project file you would like the data files to be merged with. Default project directory is /minisoft under root.
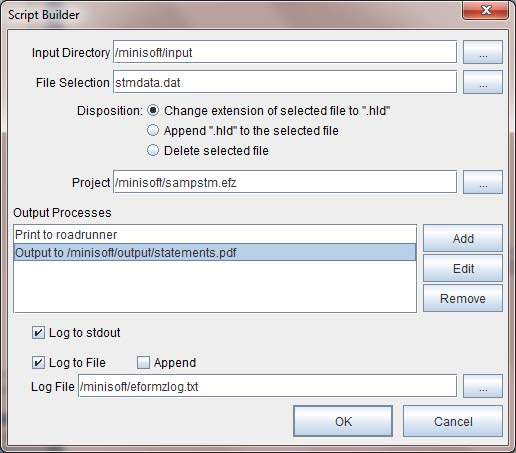
Output Process
Output process types include print, file output, and eDIRECT. Print allows you to select the printer you would like to print your merged output to. File Output allows you to output your merged file to PDF, PCL, PRN, XML, or another. Using the browse button select the directory you would like your output to reside in. eDIRECT allows you to specify an eDIRECT process.
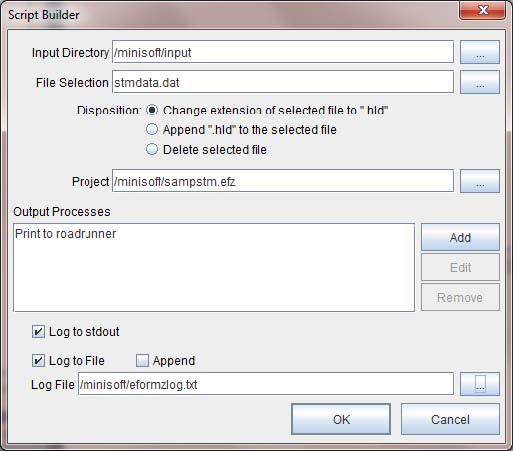
Note: Multiple processes can be added to the Output Processes.
3. Once your output types have been defined they will appear in the Output Process field. Use the Add, Edit, or Remove buttons if necessary.
4. Select the logging format.
Log to stdout – Logs to your display output.
Log to File – Logs all processes to a log file as defined in the Log File field. To set the log file name and location on the Unix system, select the browse icon.
5. Once complete, click OK.
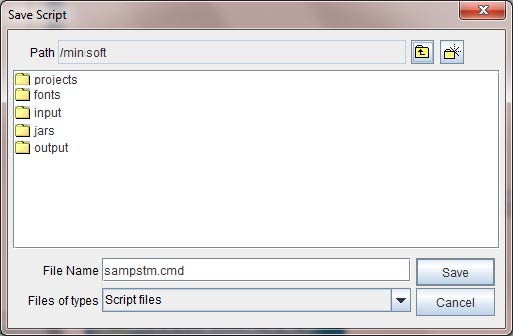
6. The Save Script dialog box displays. Enter a command file name (.cmd) and click Save.
NOTE: After the transfer of the command file to the host system, a change to the attributes of the command file must take place. From your host machine:
1. Logon as Administrator (root).
2. Change the directory to minisoft.
3. From the minisoft directory change the attributes of the project file: chmod 755 {command file name}.cmd
TIP: You can also edit an existing script file from a Unix system by selecting Host Tools > Unix > Edit Project Script. Login to your host system and select the script file you would like to edit from the specified directory. The script file will display in the Script Builder. Make the necessary changes and then click Save.
Script Command Example
-a <filename> Append to logfile. Example: -a “eformzlog.txt”
-c <directory><filemask> <copy to directory> Copy files after output.Example: -c ”/minisoft/input/*.hld /minisoft/backup”
-d <directory> Specify input directory. Example: -d ”/minisoft/salesorders”
-e <basedirectory> Process with eDIRECT. The base directory will be the directory the eDIRECT output will be sent to. Example: -e ”/minisoft/invoice/output”
-f <filemask[:disposition>] Specify file selection and optionally disposition. Optional dispositions include: rename and deleteExample: -f ”inv.data:rename”
-help -help
-l <filename> Log to file. Example: -l ”eformzlog.txt”
-n <directory><filemask> <destination printer> Print files after output. Example: -n “/minisoft/output/*.prn roadrunner”
-o <filename> Output to file. Output file extension options include: .pdf, .prn, .pcl, .xml.Example: -o ”inv.pdf”
-p <project> Specify project file. Example: -p ”sampinv.efz”
-r <directory><filemask> Delete files after output. Example: -r ”/minisoft/input/*.hld”
-t <printer> or
-tc <color printer> Printer name. Example: -t ”LJ5si” or -tc “LJ3800DN”
-u <basefilename> Output to file with unique names. Output file extension options include: .pdf, .prn, .pcl, .xml.Example: -u ”inv_.pdf”
-v Logs to Stdout.
-x <command> Execute external command after output. Command options:mv – move commandExample: -x ”mv /minisoft/input/*.hld /minisoft/backup”
Windows
Transfer your eFORMz project files to a directory on your Windows Server running the eFORMz merge process. When eFORMz was installed on your Windows Server a Projects folder was created in the following directory:
C:\Minisoft\eFORMz_6\
Multiple directories can be added to the Projects folder for organizing your eFORMz project files, for example:
